The workspace
Contents
Introduction
The Workspace Grid
By default, a grid is visible in the workspace background.
- To hide the grid/show the grid, toggle the Show/Hide Gridlines button in the untabbed controls.
Scrolling the Workspace
The workspace can be scrolled by:
- Using the horizontal and vertical scrollbars located at the bottom and right side of the screen.
- Clicking and/or dragging to the desired location in the Navigator
- Grabbing an empty spot on the workspace and dragging it.
- Using the mouse scroll wheel when no other object has its focus (for vertical scrolling only).
Resizing the Workspace
There is not yet any way to resize the workspace while using Rave, or to change it for an existing rave project. However you can change the workspace size for new Rave sessions by editing the preferences wswidth and wsheight. Read the main article about Rave Preferences for more information.
Placing, Selecting, and Resizing Objects on the Workspace
New objects can be placed on the workspace using the "Create New..." button on the Manage Tab, or the "Create New Workspace Object in the untabbed controls.
- When initially placing an object, you must click and drag on the workspace to indicate the object's initial position. If you draw this initial rectangle too small, you may get an error or the object may place incorrectly. (To be safe, make the rectangle at least 2"x2")
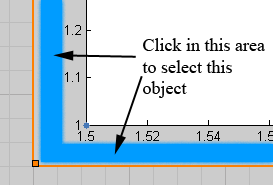
- You can select a workspace object by clicking the empty space between its outer border, and the actual axes (or table/image/etc) that is visible:
- The currently selected object shows a thick colored border. Unselected objects show a thin border the same color as the workspace gridlines.
- The currently selected object also shows a small square at each corner. Click and drag this square to resize the object.
- While resizing, the object's current size in inches is displayed in the infobar.
- As you resize a graph, its tick marks will wrap or rotate to attempt to avoid overlapping each other.
- Known bug: MATLAB does not correctly right-align the rotated tick marks. Some fonts are less succeptible to the bug than others.
- To relocate a workspace object while maintaining its current size, hold CTRL and click the same area you click to select an object. Then (while still holding CTRL) drag the object to its new location.
- Note: Currently moving objects in this way does not snap them to the grid.
- Note: Currently Table-type workspace objects cannot be moved in this way.
Changing "Pages"
The workspace is made up of multiple pages. You can change pages using the page controls, shown below:
Normally the page controls are displayed in the upper left corner of the screen when in tab mode, and in the bottom right corner when in full screen mode. On smaller monitors, the page controls may always appear in the bottom right corner.
- Use the left and right arrows to switch to the previous/next page
- You can also click the displayed page number and type a new page number to go to that page. (Hit enter after typing the number)
- The Main Table is page 0. The initial workspace view is page 1.
- You can only go to the next page if the current page has an object on it. In other words, the page controls will only let you go to one blank page at a time. If your project has objects on pages 1, 2, and 3, you can go to page 4. But you won't be able to go to page 5 until you create an object on page 4.
